The Hedera Smart Contract Service enables you to build decentralized applications and protocols that scale with Solidity smart contracts. Recent updates to this service include Ethereum Virtual Machine (EVM) upgrades, database architecture modifications, and support for Hedera Token Service. Whether you’re new to smart contract development or migrating from another smart contract platform, use Hedera to develop and deploy fast, low-cost, and carbon-negative smart contracts.
In this article you will learn how to write a getter-setter smart contract in Solidity and deploy it on the Hedera network. Watch the coding tutorial on YouTube and then check out Part 2 if you want to see a smart contract that integrates with the Hedera Token Service (HTS).
What You Will Need
Tools
- Hedera testnet account
- Development environment
- This Codesandbox is already setup for you to try this example
- Remember to provide your testnet account credentials in the .env file
- And open a new terminal to execute index.js
- Or if you prefer a local development environment, you’ll need:
- Code editor (like VS Code, or other IDE)
- Node.js
- Packages (install with a package manager like npm or yarn)
- npm install @hashgraph/sdk
- npm install dotenv
- npm install -g solc
- This Codesandbox is already setup for you to try this example
Nice-to-Have Knowledge
- A bit of Solidity (Documentation)
- Some of the Hedera basics (How to Start Developing on Hedera: Back to the Basics)
- A few things about Hedera smart contracts (Core Concepts – Hedera Documentation)
How to Deploy a Smart Contract
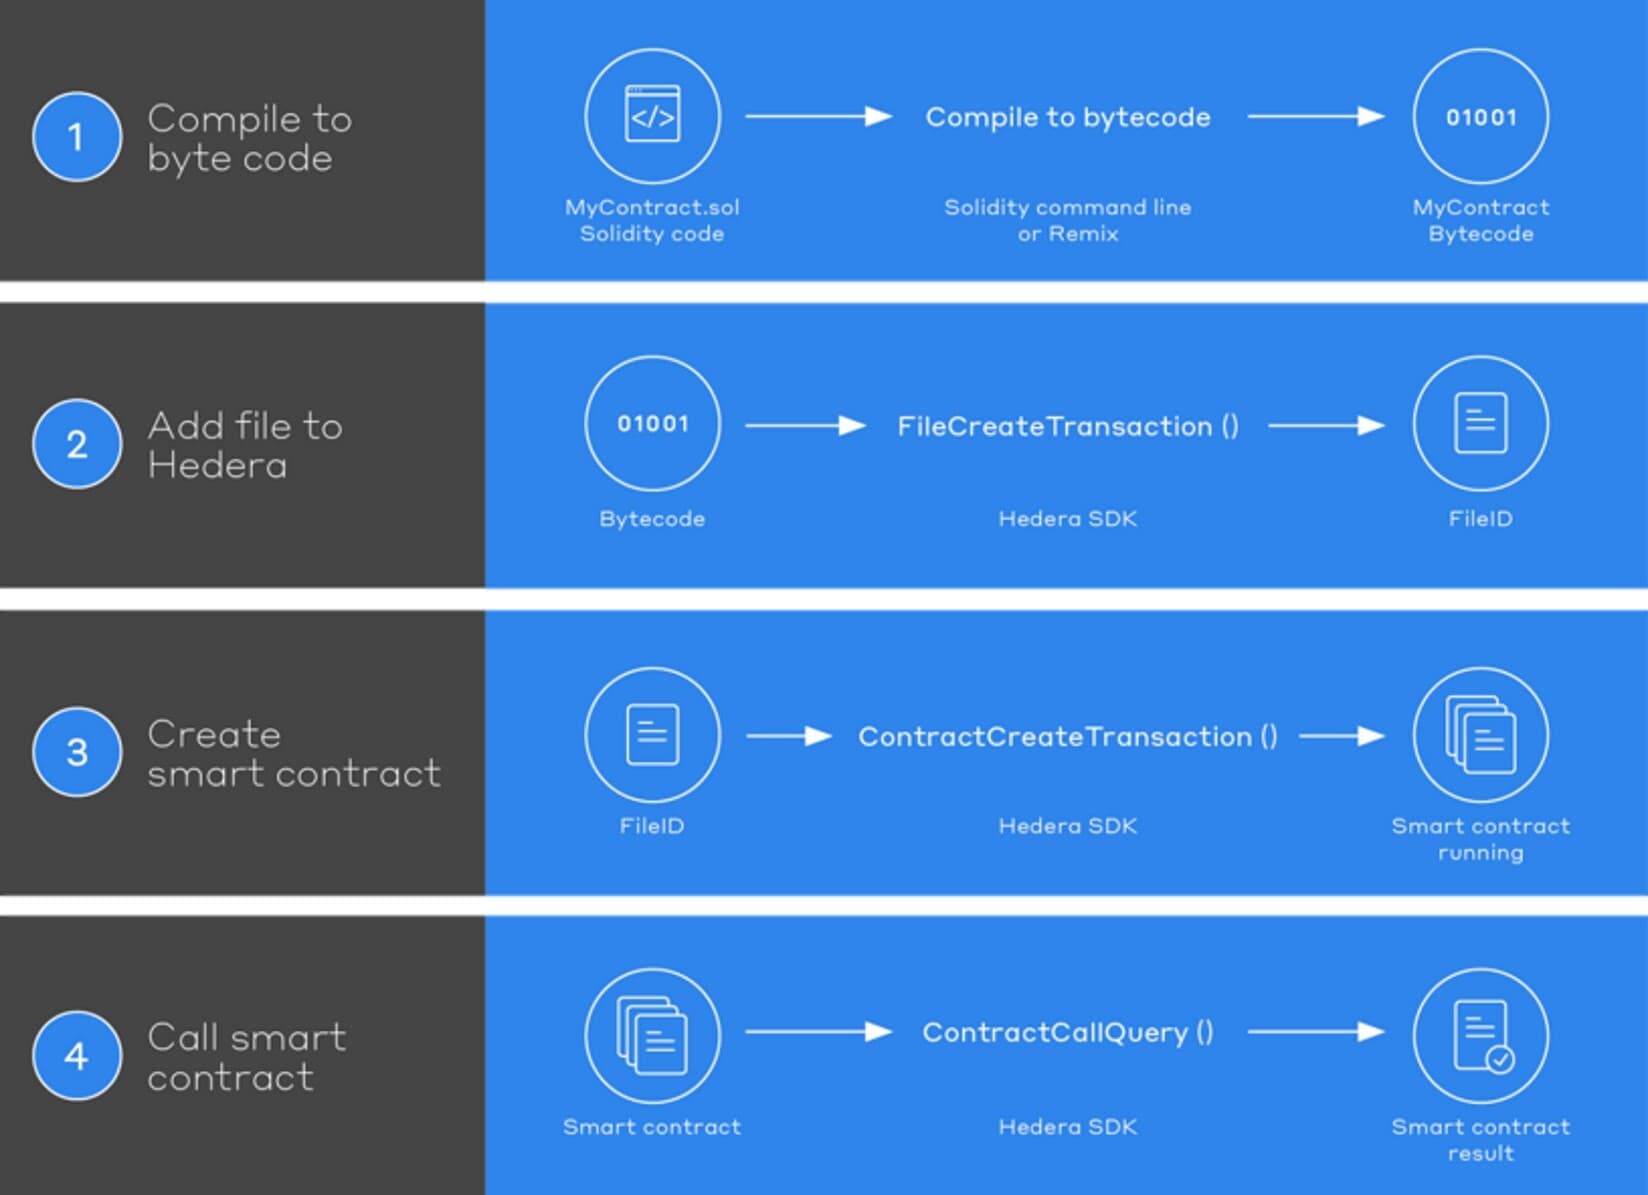
You can deploy a smart contract on Hedera in four steps:
- Write the contract and compile to bytecode
- Add the bytecode file to the Hedera network
- Create the smart contract on Hedera
- Call the smart contract

1. Write the Contract and Compile It to Get the Bytecode
Let’s write a getter-setter smart contract in Solidity. The contract shall have a state variable, and anyone can read/write values from/to that variable. You can think of this exercise as having a phone book that anyone can read from and write to.
The name of the contract is LookupContract and the state variable is called myDirectory, which is of type mapping. Mappings in Solidity are a type used to store data in the form of key-value pairs. In this case, you’re mapping a string and uint. Where uint is an alias in Solidity for uint256, a 256-bit unsigned integer.
The contract has a constructor
function, which is executed only once when the contract is first deployed and is used to initialize the state variable. The contract also has two more functions, setMobileNumber and getMobileNumber, which write values to and read values from the state variable, respectively.
Solidity contract:
// SPDX-License-Identifier: GPL-3.0
pragma solidity >=0.7.0 <0.9.0;


contract LookupContract {

mapping (string => uint) public myDirectory;

constructor (string memory _name, uint _mobileNumber) public {
        myDirectory[_name] = _mobileNumber;
    }

function setMobileNumber(string memory _name, uint _mobileNumber) public {
        myDirectory[_name] = _mobileNumber;
    }

function getMobileNumber(string memory _name) public view returns (uint) {
        return myDirectory[_name];
    }
}
The smart contract is executed by the EVM. However, Solidity code cannot be executed by the EVM. Instead, you need to compile this code to low-level machine code that the EVM can understand. Once that compilation is done, you end up with the bytecode
for the smart contract.
After installing the solc package (npm install -g solc), type the following command in the terminal to start the compilation:
solcjs --bin LookupContract.sol
You may receive a few warnings, but that’s ok. If the compilation is successful, you should now have a binary file in your directory called LookupContract_sol_LookupContract.bin, which contains the compiled bytecode.
608060405234801561001057600080fd5b50604051620007403803806200074083398181016040528101906100349190610212565b8060008360405161004591906102b5565b90815260200160405180910390208190555050506102cc565b6000604051905090565b600080fd5b600080fd5b600080fd5b600080fd5b6000601f19601f8301169050919050565b7f4e487b7100000000000000000000000000000000000000000000000000000000600052604160045260246000fd5b6100c58261007c565b810181811067ffffffffffffffff821117156100e4576100e361008d565b5b80604052505050565b60006100f761005e565b905061010382826100bc565b919050565b600067ffffffffffffffff8211156101235761012261008d565b5b61012c8261007c565b9050602081019050919050565b60005b8381101561015757808201518184015260208101905061013c565b83811115610166576000848401525b50505050565b600061017f61017a84610108565b6100ed565b90508281526020810184848401111561019b5761019a610077565b5b6101a6848285610139565b509392505050565b600082601f8301126101c3576101c2610072565b5b81516101d384826020860161016c565b91505092915050565b6000819050919050565b6101ef816101dc565b81146101fa57600080fd5b50565b60008151905061020c816101e6565b92915050565b6000806040838503121561022957610228610068565b5b600083015167ffffffffffffffff8111156102475761024661006d565b5b610253858286016101ae565b9250506020610264858286016101fd565b9150509250929050565b600081519050919050565b600081905092915050565b600061028f8261026e565b6102998185610279565b93506102a9818560208601610139565b80840191505092915050565b60006102c18284610284565b915081905092915050565b61046480620002dc6000396000f3fe608060405234801561001057600080fd5b50600436106100415760003560e01c806314b3ee68146100465780639f11592114610076578063fd8111e914610092575b600080fd5b610060600480360381019061005b9190610298565b6100c2565b60405161006d91906102fa565b60405180910390f35b610090600480360381019061008b9190610341565b6100e9565b005b6100ac60048036038101906100a79190610298565b610110565b6040516100b991906102fa565b60405180910390f35b600080826040516100d39190610417565b9081526020016040518091039020549050919050565b806000836040516100fa9190610417565b9081526020016040518091039020819055505050565b6000818051602081018201805184825260208301602085012081835280955050505050506000915090505481565b6000604051905090565b600080fd5b600080fd5b600080fd5b600080fd5b6000601f19601f8301169050919050565b7f4e487b7100000000000000000000000000000000000000000000000000000000600052604160045260246000fd5b6101a58261015c565b810181811067ffffffffffffffff821117156101c4576101c361016d565b5b80604052505050565b60006101d761013e565b90506101e3828261019c565b919050565b600067ffffffffffffffff8211156102035761020261016d565b5b61020c8261015c565b9050602081019050919050565b82818337600083830152505050565b600061023b610236846101e8565b6101cd565b90508281526020810184848401111561025757610256610157565b5b610262848285610219565b509392505050565b600082601f83011261027f5761027e610152565b5b813561028f848260208601610228565b91505092915050565b6000602082840312156102ae576102ad610148565b5b600082013567ffffffffffffffff8111156102cc576102cb61014d565b5b6102d88482850161026a565b91505092915050565b6000819050919050565b6102f4816102e1565b82525050565b600060208201905061030f60008301846102eb565b92915050565b61031e816102e1565b811461032957600080fd5b50565b60008135905061033b81610315565b92915050565b6000806040838503121561035857610357610148565b5b600083013567ffffffffffffffff8111156103765761037561014d565b5b6103828582860161026a565b92505060206103938582860161032c565b9150509250929050565b600081519050919050565b600081905092915050565b60005b838110156103d15780820151818401526020810190506103b6565b838111156103e0576000848401525b50505050565b60006103f18261039d565b6103fb81856103a8565b935061040b8185602086016103b3565b80840191505092915050565b600061042382846103e6565b91508190509291505056fea264697066735822122049e6ca88d0242a5a423ce392b61870ac108ba49ce39c259ea7620a60ac3c6b3664736f6c634300080b0033
2. Add File to Hedera
Now it’s time to add the bytecode to Hedera using the File Service. Start by reading the contents of the binary file. Then use the FileCreateTransaction() module from the SDK and specify the contents of the file to be the contract bytecode. Specify a few additional properties for the transaction, like the keys to manage the file and the maximum you’re willing to pay in hbar for that transaction. Sign the transaction with the corresponding private key, execute the signed transaction with the Hedera client, and get a receipt for the transaction. You get the ID for the bytecode file from the transaction receipt.
// Import the compiled contract bytecode
const contractBytecode = fs.readFileSync("LookupContract_sol_LookupContract.bin");

// Create a file on Hedera and store the bytecode
const fileCreateTx = new FileCreateTransaction()
	.setContents(contractBytecode)
	.setKeys([operatorKey])
	.setMaxTransactionFee(new Hbar(0.75))
	.freezeWith(client);
const fileCreateSign = await fileCreateTx.sign(operatorKey);
const fileCreateSubmit = await fileCreateSign.execute(client);
const fileCreateRx = await fileCreateSubmit.getReceipt(client);
const bytecodeFileId = fileCreateRx.fileId;
console.log(`- The bytecode file ID is: ${bytecodeFileId} n`);
Console output:

3. Create the Smart Contract on Hedera
Once the bytecode file is on the Hedera network, you can create (or instantiate) the contract using ContractCreateTransaction(). Specify the bytecode file ID based on the previous step, set the maximum amount of gas you’re willing to pay, and pass function parameters to the constructor function. Let’s initialize the state variable myDirectory with the key-value pair “Alice” and 111111.
As a convenient alternative to ContractCreateTransaction, you can use ContractCreateFlow() to create the file storing the bytecode and contract in a single step. This single call handles for you the FileCreateTransaction(), FileAppendTransaction(), and ContractCreateTransaction() operations.
Execute the transaction, get a receipt, and obtain the ID of the deployed smart contract from that receipt. You can optionally convert the contract ID to solidity format and output that information to the console.
// Instantiate the smart contract
const contractInstantiateTx = new ContractCreateTransaction()
	.setBytecodeFileId(bytecodeFileId)
	.setGas(100000)
	.setConstructorParameters(new ContractFunctionParameters().addString("Alice").addUint256(111111));
const contractInstantiateSubmit = await contractInstantiateTx.execute(client);
const contractInstantiateRx = await contractInstantiateSubmit.getReceipt(client);
const contractId = contractInstantiateRx.contractId;
const contractAddress = contractId.toSolidityAddress();
console.log(`- The smart contract ID is: ${contractId} n`);
console.log(`- Smart contract ID in Solidity format: ${contractAddress} n`);
Console output:

4. Execute and Query the Smart Contract
The last step is to simply start interacting with your new smart contract! Do this in three steps:
- query the contract to check the value passed during initialization
- call a contract function to update the state variable
- query the contract again to check the value passed in the previous contract call
For the first step, query the contract using ContractCallQuery(), set the contract ID, the gas reservation, and the function you want to call. For this query, call the getMobileNumber function and pass “Alice” as the parameter value. This query costs some gas because it still uses the bandwidth and CPU cycles of a network node, and the gas fees reflect the usage of those resources. However, there is no separate query payment needed for this action, and you can check that by setting the maximum query payment to 1 tinybar (lowest possible value on Hedera). Now execute the query, get the uint256 return value, and output that information to the console.
If the constructor initialization from the previous step worked, then this should return the value in the state variable myDirectory corresponding to the key “Alice”.
// Query the contract to check changes in state variable
const contractQueryTx = new ContractCallQuery()
	.setContractId(contractId)
	.setGas(100000)
	.setFunction("getMobileNumber", new ContractFunctionParameters().addString("Alice"))
	.setMaxQueryPayment(new Hbar(0.00000001));
const contractQuerySubmit = await contractQueryTx.execute(client);
const contractQueryResult = contractQuerySubmit.getUint256(0);
console.log(`- Here's the phone number you asked for: ${contractQueryResult} n`);
Console output:

For the second step, call a contract function using ContractExecuteTransaction(). Similar to the query, set the contract ID, the gas reservation, and the function with the desired parameters values. With the setMobileNumber
function you must provide the key-value pair for the state variable myDirectory, so pass “Bob” and 222222. You can also set the maximum fee you want to pay for this transaction in hbar. Now execute the transaction, get a receipt, and output a confirmation to the console.
// Call contract function to update the state variable
const contractExecuteTx = new ContractExecuteTransaction()
	.setContractId(contractId)
	.setGas(100000)
	.setFunction("setMobileNumber", new ContractFunctionParameters().addString("Bob").addUint256(222222))
	.setMaxTransactionFee(new Hbar(0.75));
const contractExecuteSubmit = await contractExecuteTx.execute(client);
const contractExecuteRx = await contractExecuteSubmit.getReceipt(client);
console.log(`- Contract function call status: ${contractExecuteRx.status} n`);
Console output:

For the final step, query the contract once again to check that Bob’s number was added to the state variable. You can reuse the code from the first query.
// Query the contract to check changes in state variable
const contractQueryTx1 = new ContractCallQuery()
	.setContractId(contractId)
	.setGas(100000)
	.setFunction("getMobileNumber", new ContractFunctionParameters().addString("Bob"))
	.setMaxQueryPayment(new Hbar(0.00000001));
const contractQuerySubmit1 = await contractQueryTx1.execute(client);
const contractQueryResult1 = contractQuerySubmit1.getUint256(0);
console.log(`- Here's the phone number you asked for: ${contractQueryResult1} n`);
Console output:

And that’s it! You just deployed, queried, and executed a smart contract on Hedera!
Check out Part 2 of this article series to learn how to deploy smart contracts that interact with other Hedera services.
For feedback on this article or future articles you would like to see, let us know via the Hedera Discord server.
Check Out the Code and Try It
Check out the code in GitHub
Try the code in Codesandbox (remember to provide your account credentials in the .env file)
Continue Learning about Smart Contracts
Hedera Service Solidity Libraries (SDKs – Hedera Documentation)


