
In this step-by-step tutorial, you will create a simple counter dApp on the Hedera network using Solidity, React JS, MetaMask, and Ethers JS. The goal with this example is to help you understand the fundamentals of dApp development, making it easier for you to create more complex dApps in the future.
Let’s dive in and start building our counter dApp on Hedera!
Try It Yourself
- Get a Hedera Testnet account:
-
This portal acts like a faucet, giving you 10,000 test HBAR every 24 hours.
-
If you’re new to Hedera, check out these steps to set up your development environment.
-
- Try the example quickly using this Gitpod:
-
Continue with your GitHub account.
-
In the lower right corner, click the prompt “Open Browser.”
-
-
Get the example code from GitHub.
Tools You Will Use
-
React JS (Documentation)
-
MetaMask (Documentation)
-
Ethers JS (Documentation)
-
Solidity (Documentation)
-
Hedera JSON-RPC Relay (Hashio)
-
Mirror node REST API (Learn More)
-
Mirror node explorer (HashScan)
-
Axios (npm package)
Goals
-
Understand the fundamentals of integrating an ethers provider for communication between a React JS application, MetaMask, and a smart contract on Hedera.
-
Learn how to deploy and interact with a Solidity smart contract on Hedera using Ethers JS.
-
Use the Hedera mirror nodes to obtain on-chain information and query transaction data.
-
Explore the Hedera network and smart contract transactions using HashScan, a Hedera Network Explorer.
Application Architecture at a High Level
The counter dApp uses a simple yet robust architecture that ensures seamless interactions between various components.
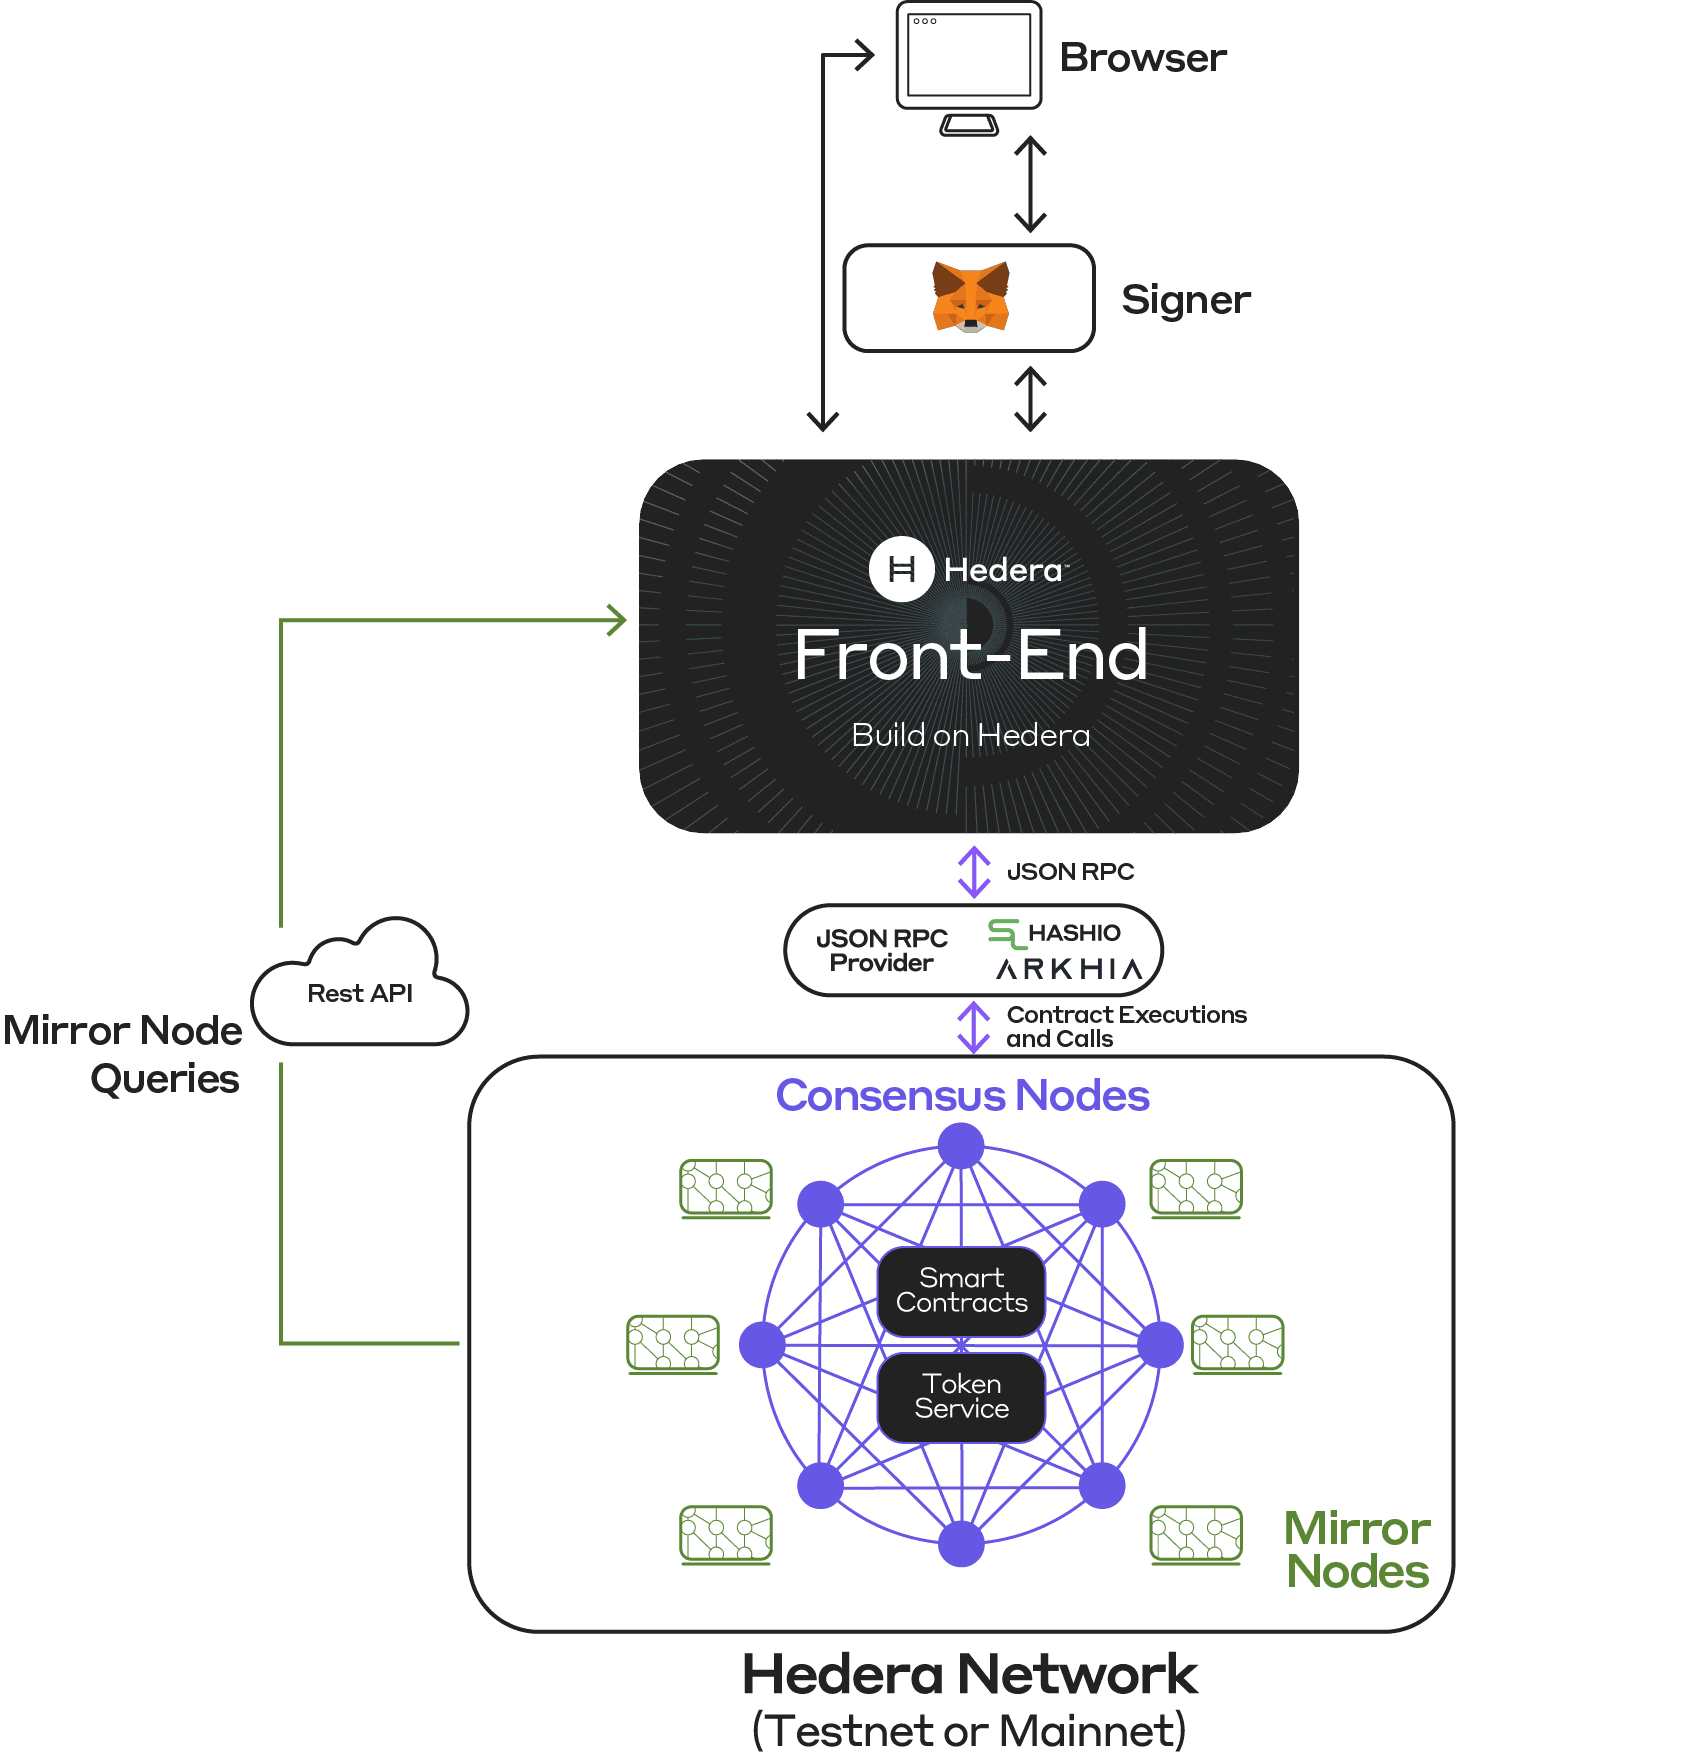
Here’s a brief explanation of each part and its role in the overall architecture:
-
Browser: The user’s web browser serves as the environment in which the dApp runs. It provides the interface for users to interact with the dApp and MetaMask.
-
Signer (MetaMask wallet): MetaMask is a browser extension that acts as a wallet and a signer for transactions created by the dApp. It securely stores the user’s private keys, manages accounts, and signs transactions when required.
-
React JS Frontend: The dApp’s user interface (UI) is built with React components, which handle user interactions and display relevant information. It communicates with MetaMask and the JSON-RPC Provider to facilitate transactions and fetch data.
-
JSON-RPC Provider (Hashio): The JSON-RPC Provider, Hashio in this case, connects the dApp to the Hedera network. It provides an API for sending transactions and querying data from the network.
-
Hedera Network (Consensus and Mirror Nodes): The Hedera network consists of consensus nodes that process and process transactions, and mirror nodes that store transaction data. Note that the Hedera network has the Consensus Service, the Token Service, and the Smart Contract Service – the JSON-RPC interface only exposes the Token and Smart Contract Services.
-
Mirror Node Queries: The dApp communicates with mirror nodes to obtain on-chain information and query transaction data. This allows the dApp to display the latest state of the smart contract and other relevant information to the user.
By understanding the architecture and connections between these components, you can appreciate the flow of data and interactions that make the counter dApp function smoothly on the Hedera network.
1. Cloning the Example Repository
To get started with the project, the first thing you will do is clone an example repository. The repository is specifically tailored for our counter dApp.
Clone the Repo
To clone the repository, open your terminal and navigate to the directory where you want to place the project. Then, run the following command:

git clone https://github.com/ed-marquez/hedera-example-metamask-counter-dapp.git
Navigate to Directory
This command clones the hedera-example-metamask-counter-dapp repository into your desired directory. Once the cloning process is complete, navigate to the project folder using:
cd hedera-example-metamask-counter-dapp
The folder structure should look something like the following.

Install Project Dependencies and Start the Application
After cloning the repo and navigating to the right folder, be sure to install all project dependencies. Dependencies are listed in the package.json file, so you can just use:
npm install
To start the application, use:
npm start
2. Getting Familiar with the dApp Structure and UI
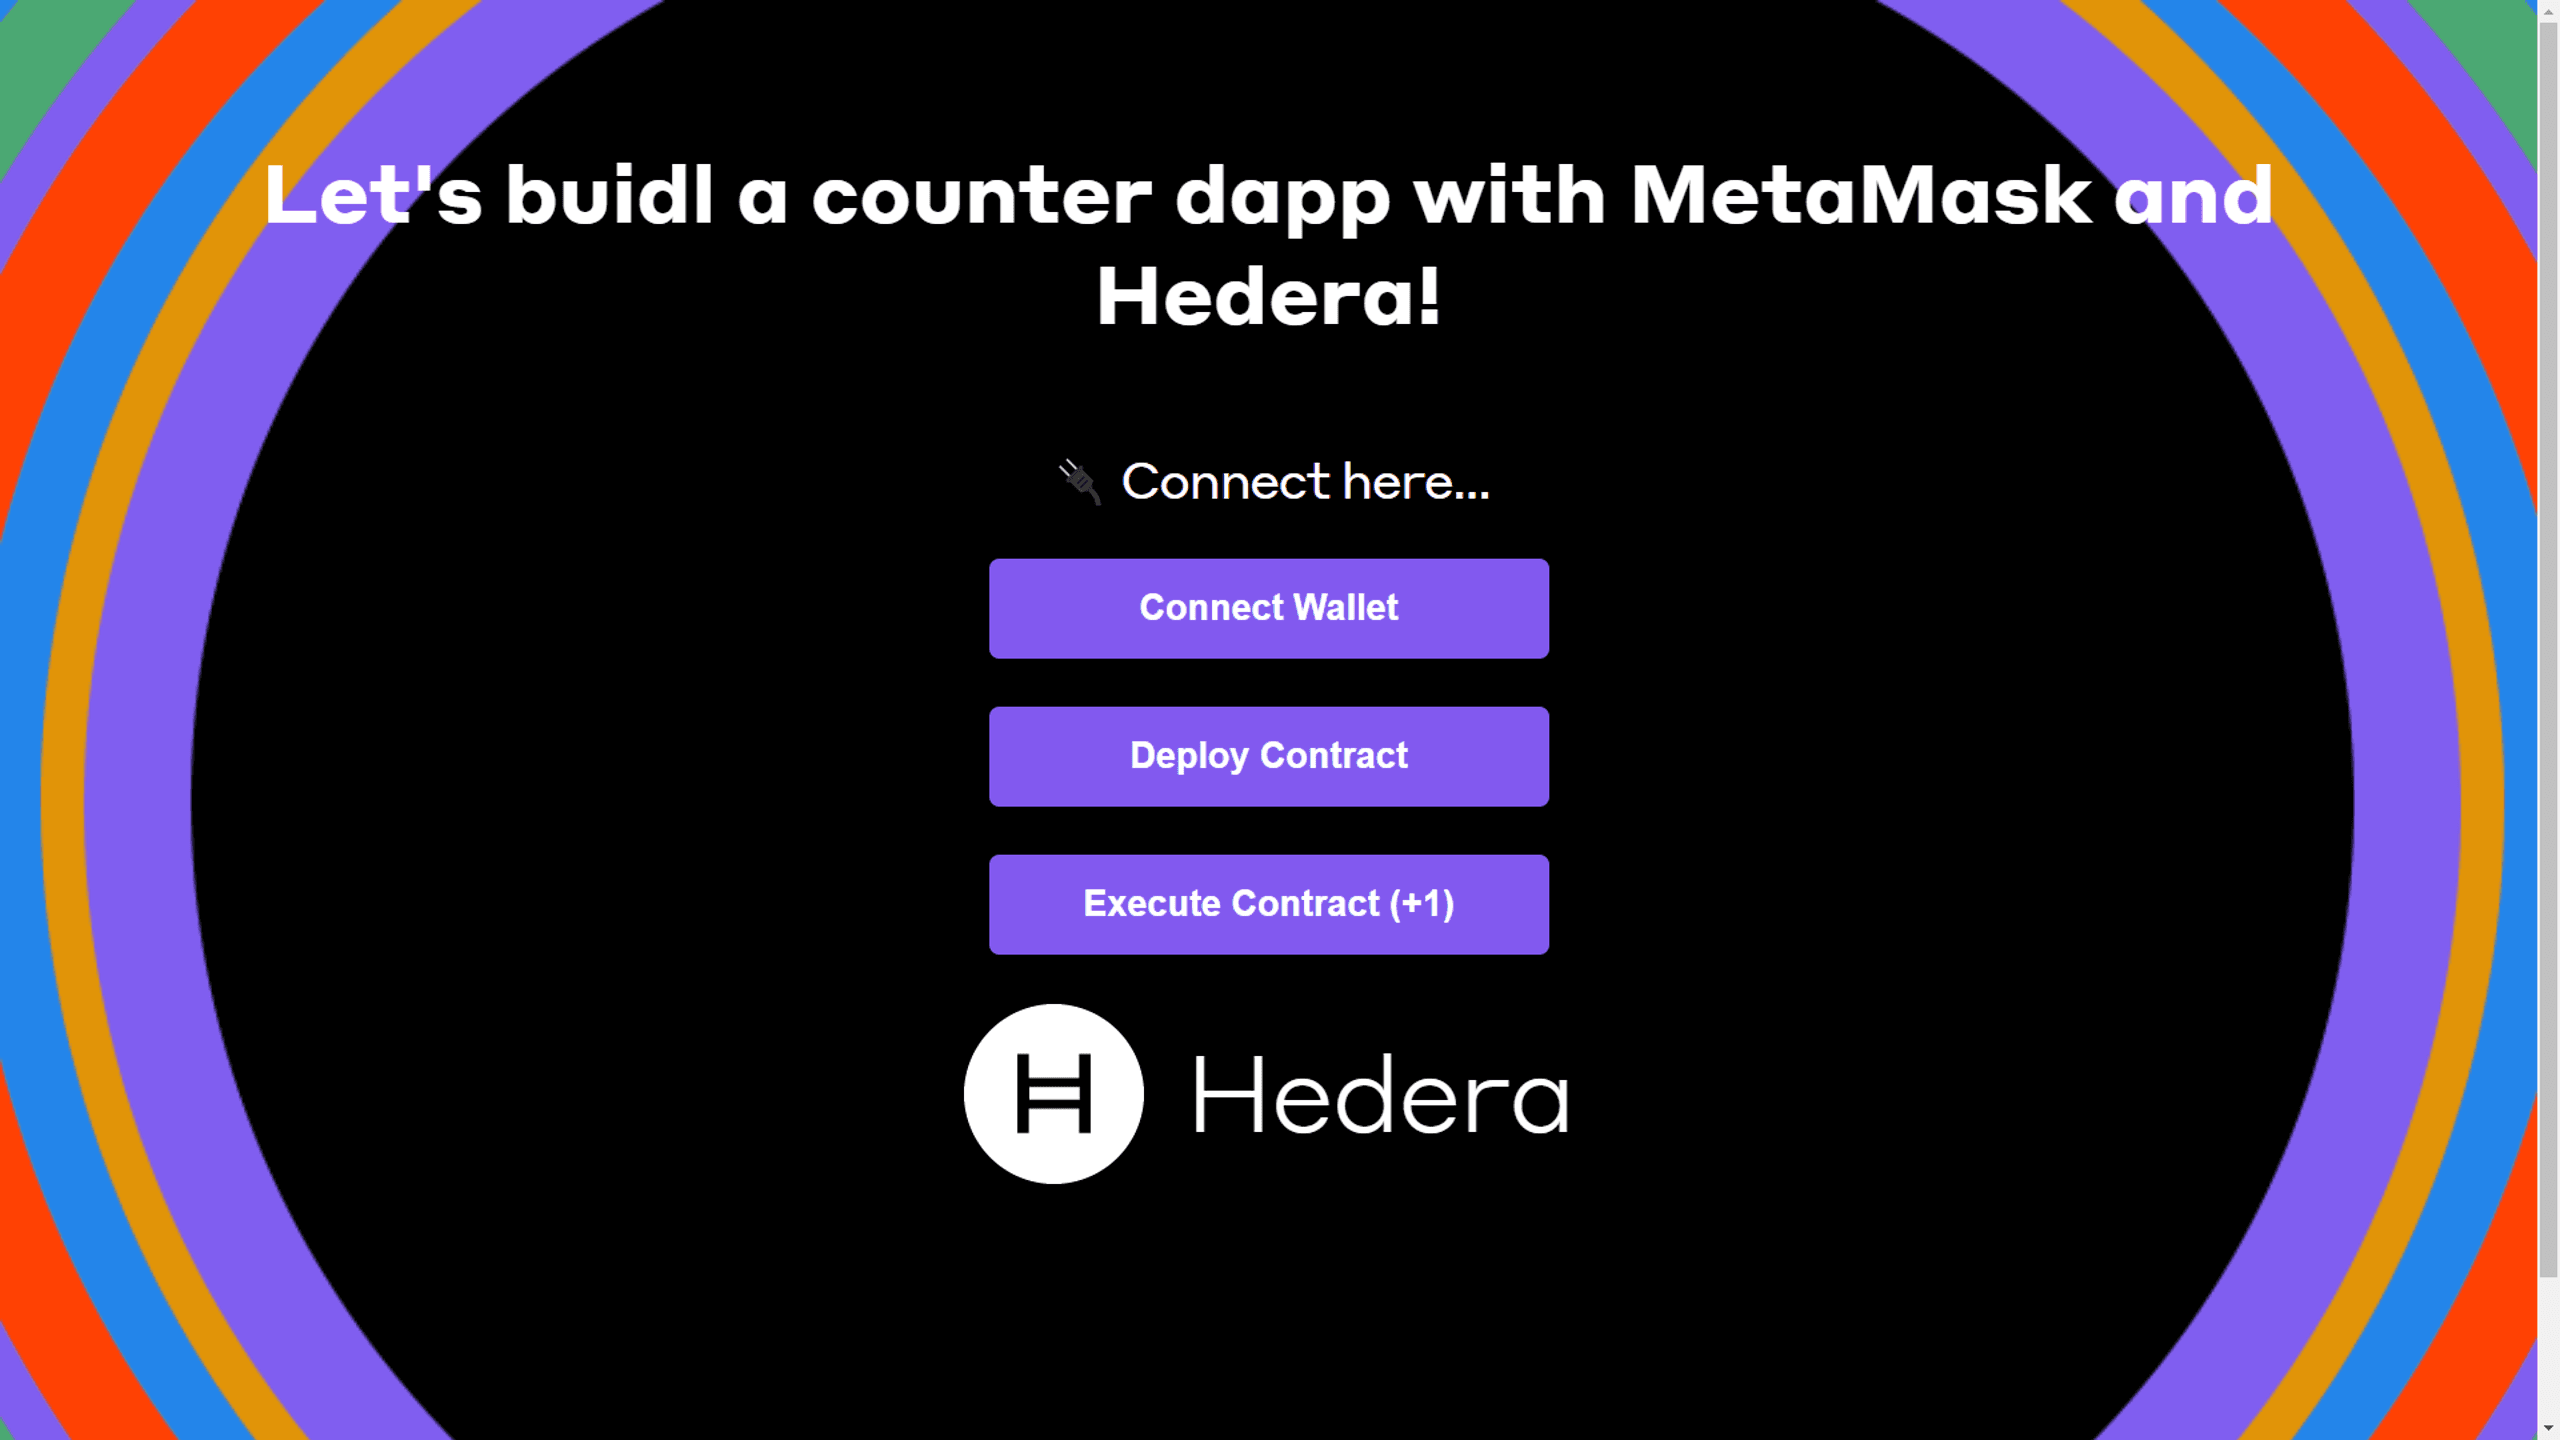
Now that you have cloned the example repository, let’s explore the project files and functions, and get a feel for how the counter dApp looks and functions! Familiarizing yourself with the project’s organization and UI elements will make it easier to follow along as you dive into the technical aspects of building the dApp.
Overall dApp Structure
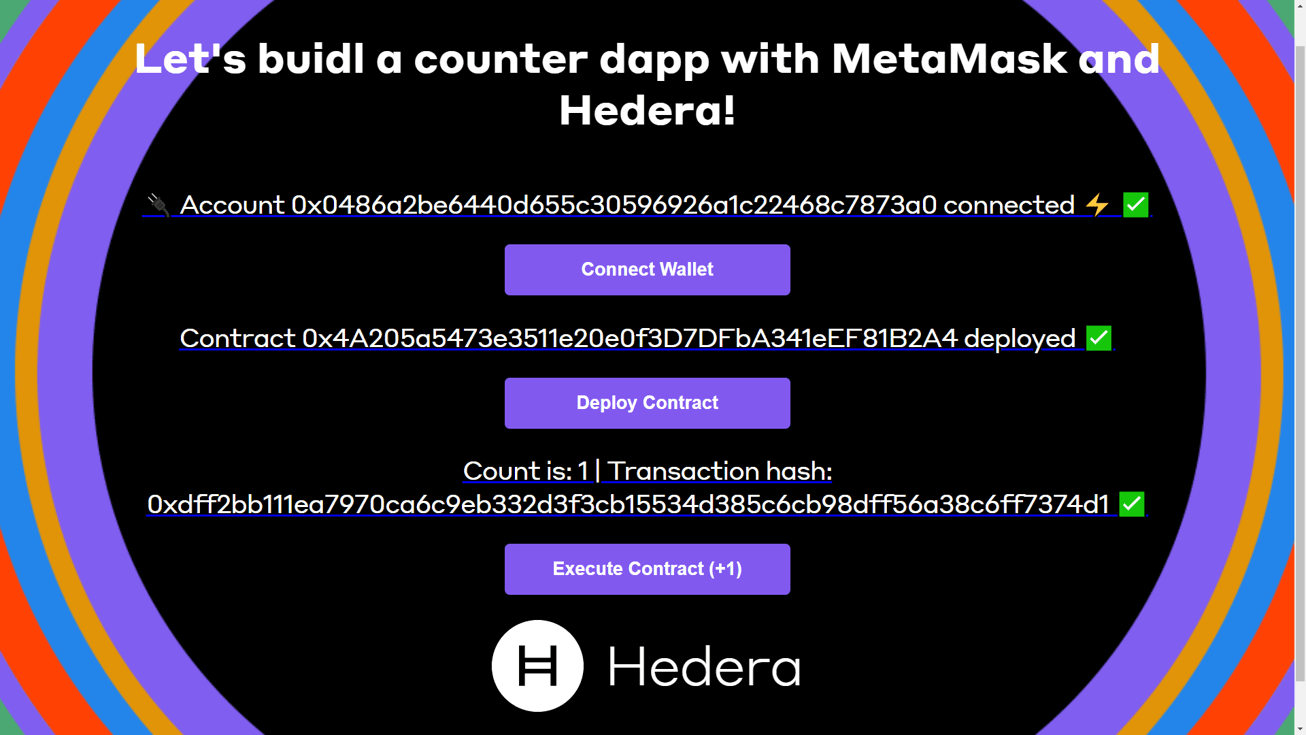
The example application has three buttons, which complete a different task when pressed.
-
The first button connects the application to MetaMask.
-
The second button deploys the Counter smart contract.
-
The third button executes a contract function to increase the count.
Now let’s look at the App.jsx file (inside the src folder) behind this UI. You can think of the code as three main sections (in addition to the imports):
-
The state management is the part that uses the useState() React Hook.
-
The functions that are executed with each button press; we’ll look at these in the next few sections.
-
The return statement groups the elements we see on the page.
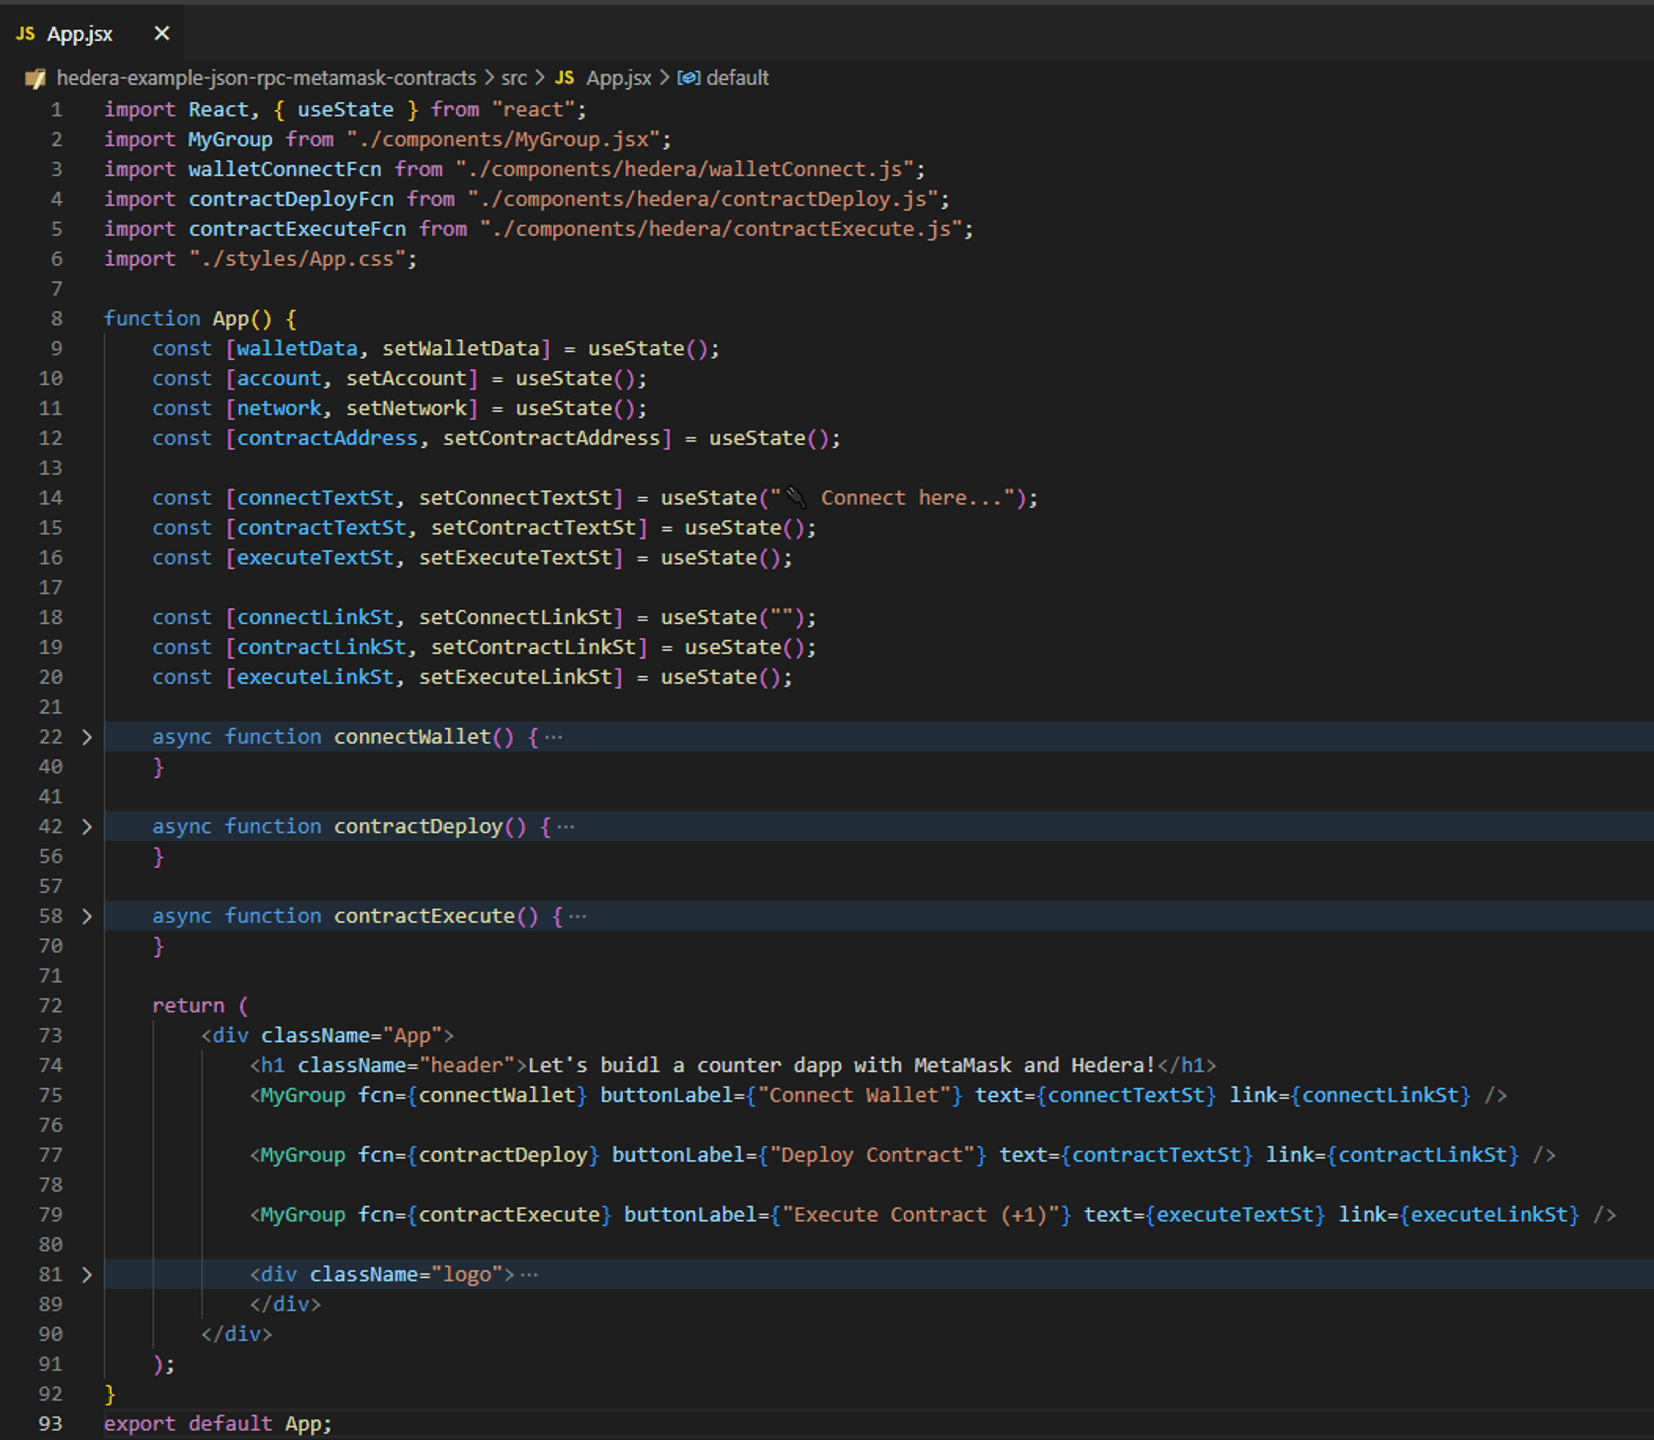
The useState() hook helps store information about the state of the application. In this case, we store information like the wallet data, the account that is connected, the network, and the contract that we’re interacting with, along with text and links that are presented in the UI. Remember that the first output of useState() is the variable of interest (e.g., walletData) and the second output is a function to set a new value for that variable (e.g., setWalletData).
Understanding the React Components
The buttons and text in the UI are part of a group of React components (MyGroup in the return statement). By grouping components, we take advantage of React’s composability for better organization and readability. Notice that MyGroup is reused three times and properties are customized for each instance (see React props) – like the function that each button executes, the label of the button, the text above the button, and the link for that text.
MyGroup
import React from "react";
import MyButton from "./MyButton.jsx";
import MyText from "./MyText.jsx";
function MyGroup(props) {
return (
MyGroup is a functional component that combines a text element with a button and receives props as an argument. These properties include:
-
text: The text to be displayed by the MyText component.
-
link: An optional link to be associated with the MyText component. If provided, the text will become clickable and redirect to the specified link.
-
fcn: A function to be executed when the button within the MyButton component is clicked.
-
buttonLabel: The label for the button in the MyButton component.
Inside the component, we return a div element that contains both the MyText and MyButton components. We pass the corresponding props down to these child components, allowing them to render the text, link, button label, and assign the click event handler. Finally, by exporting the MyGroup, we make it available for use in other parts of the application, enabling us to quickly create reusable groups of text and button elements throughout the dApp.
MyButton
import React from "react";
function MyButton(props) {
return (
);
}
export default MyButton;
MyButton accepts the following props:
-
fcn: A function to be executed when the button is clicked.
-
buttonLabel: The label for the button, which will be displayed as the button’s text.
Inside the component, we return a div element that wraps a button element. The button element is assigned the onClick event handler with the function props.fcn. This allows us to execute a specified function when the button is clicked. The className attribute is set to “cta-button,” which is used for styling the button with CSS. Finally, we display the props.buttonLabel as the button’s text.
Lastly, by exporting MyButton, we make it available for use in other groups or parts of the application, allowing us to easily create consistent and reusable buttons throughout the DApp with customized functionality and labels.
MyText
import React from "react";
function MyText(props) {
if (props.link !== "") {
return (
);
} else {
return (
{props.text}
);
}
}
export default MyText;
MyText displays text and optionally wraps it in a link. It takes props as an argument, including:
-
text: The text to be displayed.
-
link: An optional link to be associated with the text.
Inside the component, we use a conditional statement to check if props.link is provided. If it is, we wrap the text within an <a> element, making it clickable and redirecting to the specified link. If no link is provided, we simply display the text within a <p> element. Both elements have the className “sub-text” for consistent styling. Finally, we export the MyText component so it can be used in other parts of the application, allowing for easy creation of text elements with optional links.
You can find the JSX files for the MyGroup, MyButton, and MyText functional components under the folder src -> components.
3. Connecting MetaMask to the dApp: Switch to Hedera Testnet and Pair Account
Now that we are familiar with the structure and UI of our application, it’s time to connect MetaMask to our dApp, switch to the Hedera Testnet, and pair an account.
In App.jsx, we use the connectWallet() function (code tab 1), which in turn calls the walletConnectFcn() function (code tab 2) that is imported from the file src -> components -> hedera -> walletConnect.js.
Connecting MetaMask
When the “Connect Wallet” button is pressed in the dApp, the connectWallet() function is executed. This function checks if an account is already connected. If it is, a message displaying the connected account is shown. If no account is connected, the walletConnectFcn() is called to establish a connection.
Switching to Hedera Testnet and Pairing Account
The walletConnectFcn() function performs the following steps:
-
Create an ethers provider: It initializes an ethers provider using the Web3Provider from the ethers library, which connects to MetaMask. An Ethers provider serves as a bridge between your application and the Hedera network. It allows you to send transactions, query data, and perform various interactions with smart contracts.
-
Switch to Hedera Testnet: It determines the chainId based on the chosen Hedera network (testnet, previewnet, or mainnet) and sends a wallet_addEthereumChain request to MetaMask to add the corresponding Hedera network. A chain ID is a unique identifier that represents a blockchain network. This is an important step that includes setting the native currency (HBAR) and providing the JSON-RPC and network explorer URLs. For JSON-RPC provider, this example uses Hashio, which is a JSON-RPC relay community service provided by Swirlds Labs (note that anyone can host their own relay and/or use other commercial providers, like Arkhia). For network explorer, HashScan is used. (Keep in mind that HashScan supports EIP-3091, which makes it easy to explore historical information about things like blocks, transactions, accounts, contracts, and tokens from wallets like MetaMask.)
-
Connect and Pair Account: The function sends an eth_requestAccounts request to MetaMask to access the user’s Hedera account. Upon successful connection, the selected account is returned.
Finally, the connectWallet() function updates the React state with the connected testnet account, network, and other wallet data, allowing the dApp to display the connected testnet account information and interact with the smart contract.
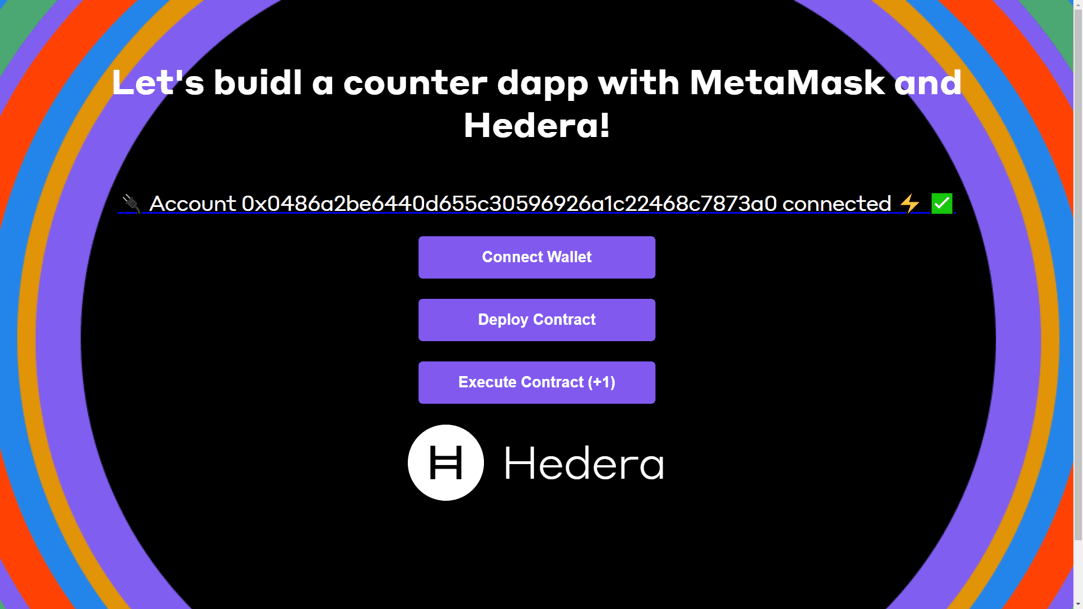
This is what you would see when clicking the “Connect Wallet” button for the first time.
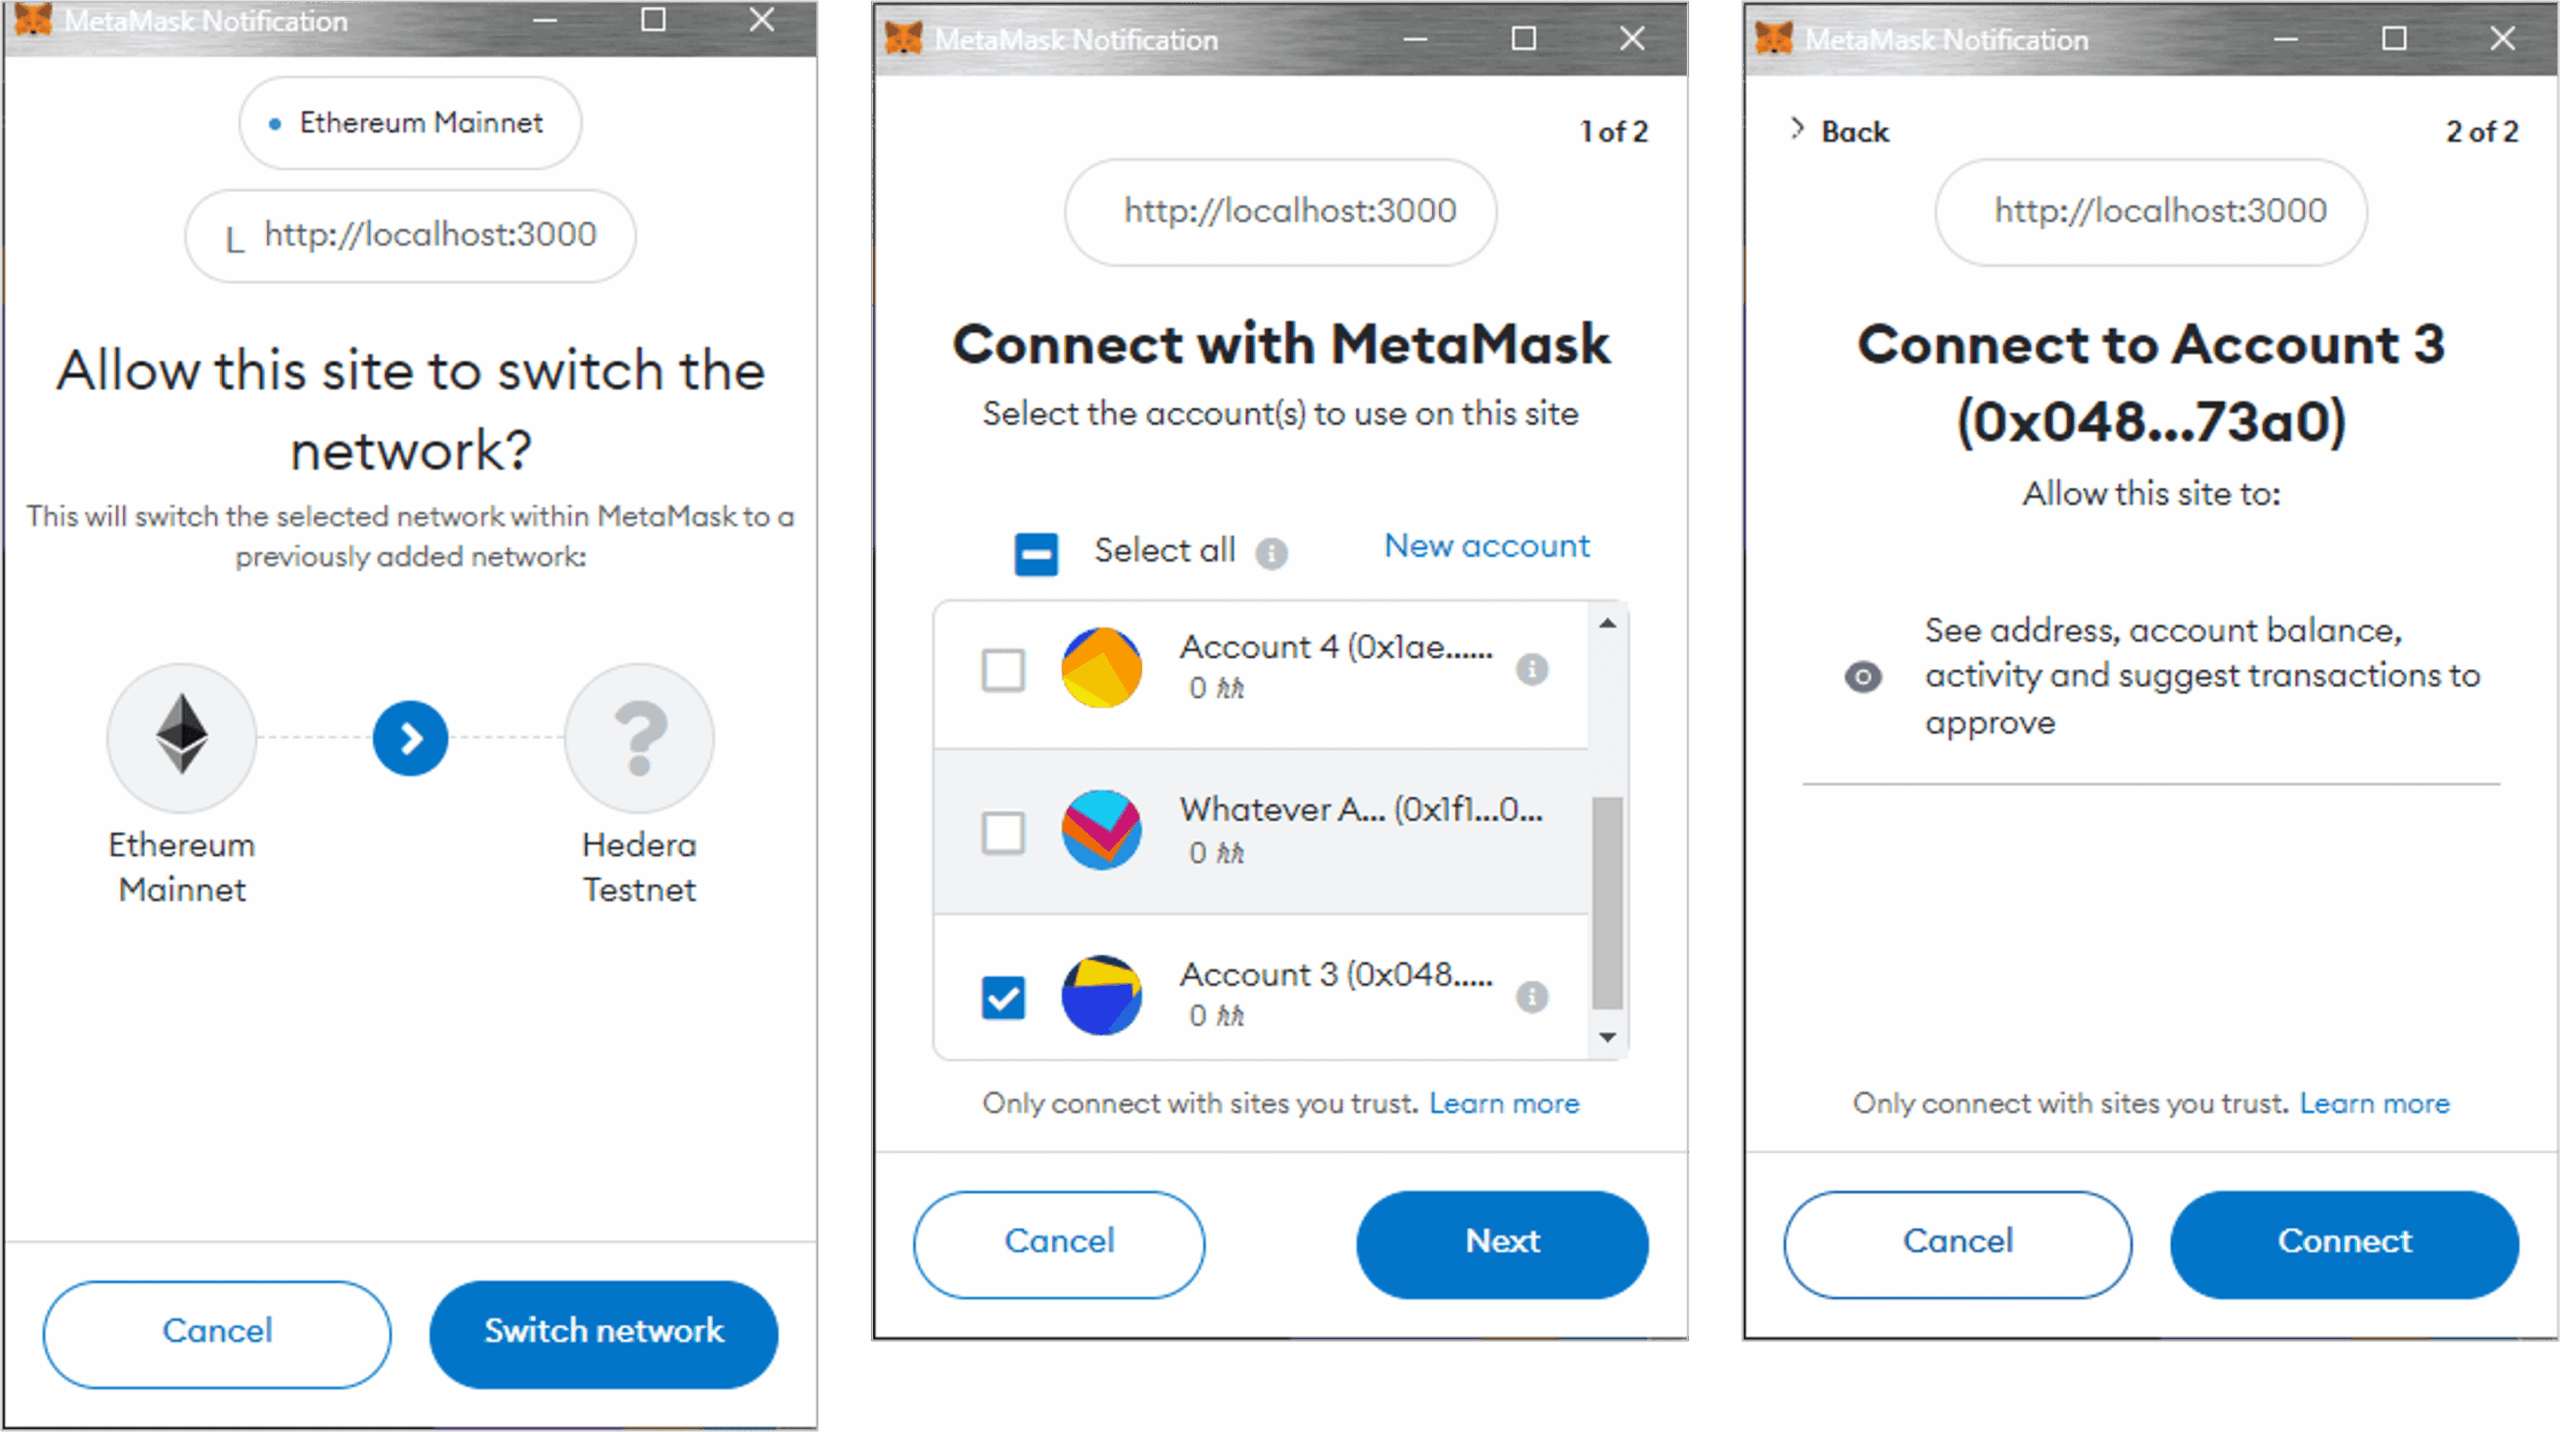
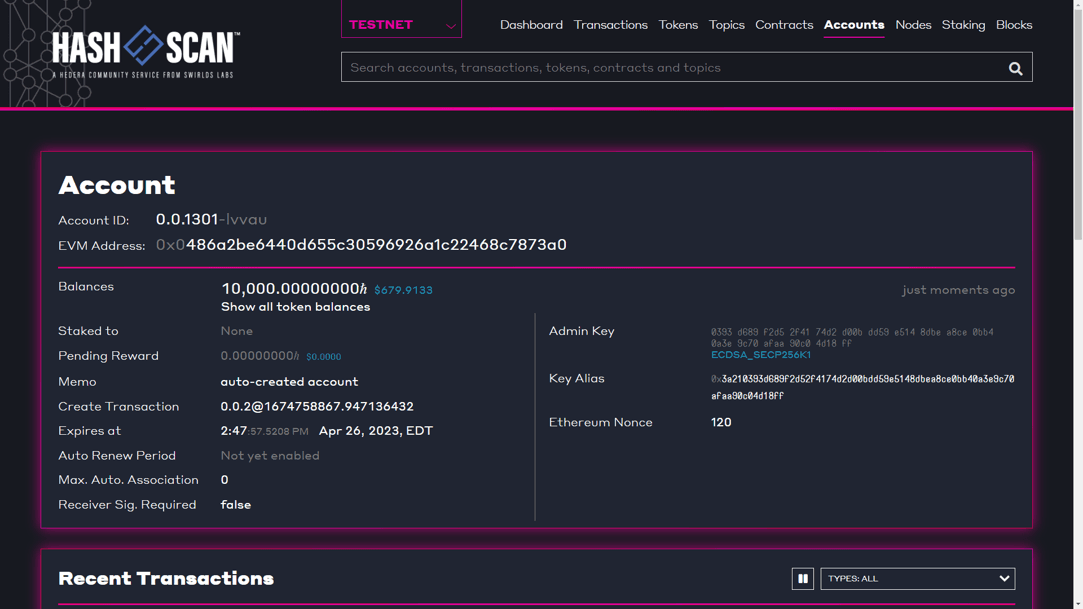
Once the network switching and the account pairing are complete, you should see something like the following in the dApp UI and in HashScan (if you click on the hyperlinked text showing the account address).
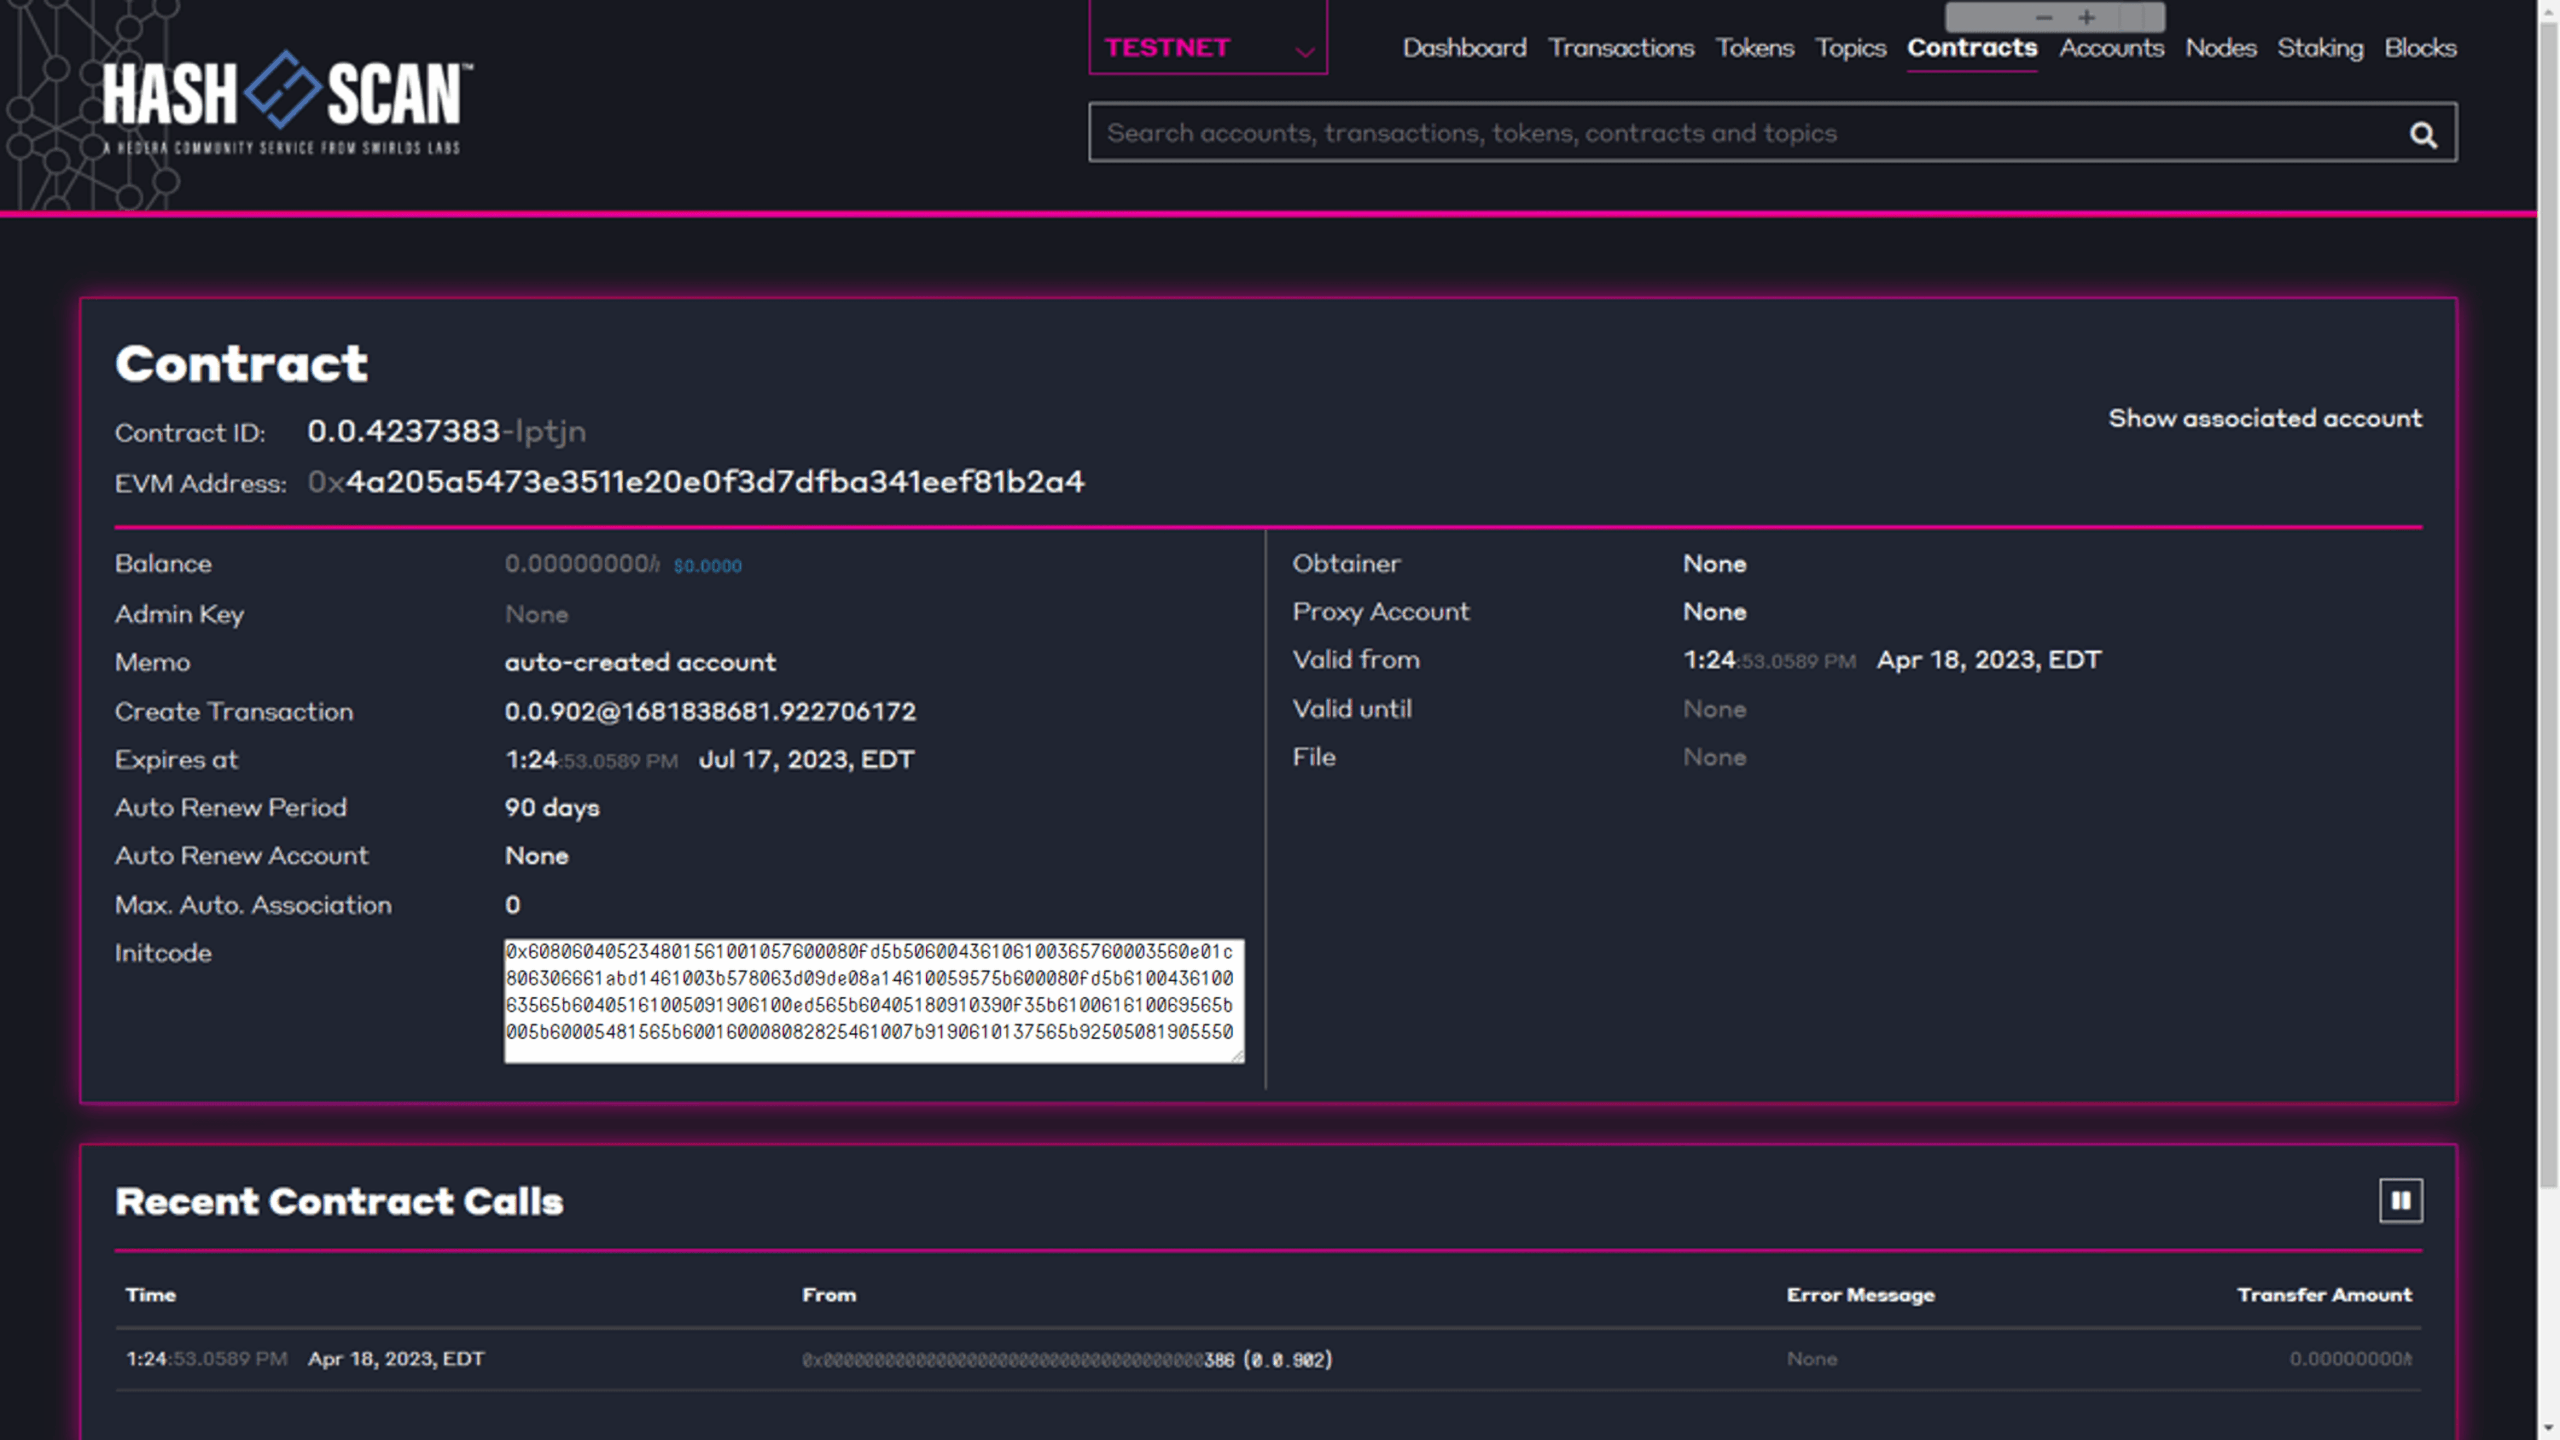
4. Deploying the Smart Contract – The Counter
Now it’s time to deploy the Counter smart contract on the Hedera network using the contractDeploy() function (code tab 1) in App.jsx and the contractDeployFcn() function (code tab 2) in src -> components -> hedera -> contractDeploy.js.
The Counter smart contract in Solidity (code tab 3) is simple, with a count variable and an increment() function that increases the count and emits an event. Events in Solidity provide a way to log things and actions that take place in your smart contracts. When an event is emitted, it stores the arguments in a special on-chain data structure called the transaction log.
When the “Deploy Contract” button is pressed in the dApp, the contractDeploy() function is executed. This function first checks if a wallet is connected. If not, it prompts the user to connect one. If a wallet is connected, the contractDeployFcn() function is called with walletData as its argument.
The contractDeployFcn() function performs the following steps:
-
Get ethers provider and signer: It extracts the ethers provider and signer from the walletData. A signer is a crucial component in blockchain-based applications, responsible for signing transactions and messages using a private key.
-
Deploy the smart contract: It initializes a ContractFactory with the contract’s ABI and bytecode, and the signer. It then deploys the contract with a specified gas limit. In Ethers.js, a ContractFactory is an object that helps you deploy a new smart contract, whereas the Contract class is used to interact with already deployed contracts. Once the deployment transaction is confirmed, the contract address is extracted.
Finally, the contractDeploy() function updates the React state with the contract address, allowing the dApp to display the contract’s deployment status and interact with the contract.
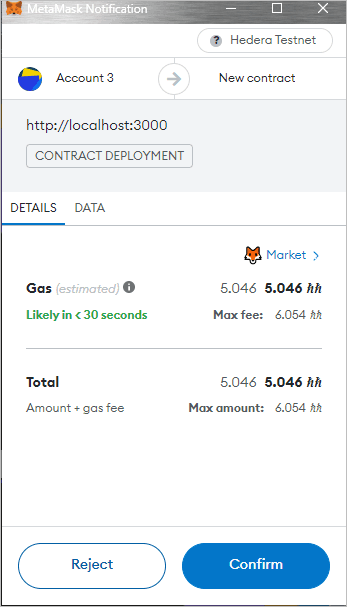
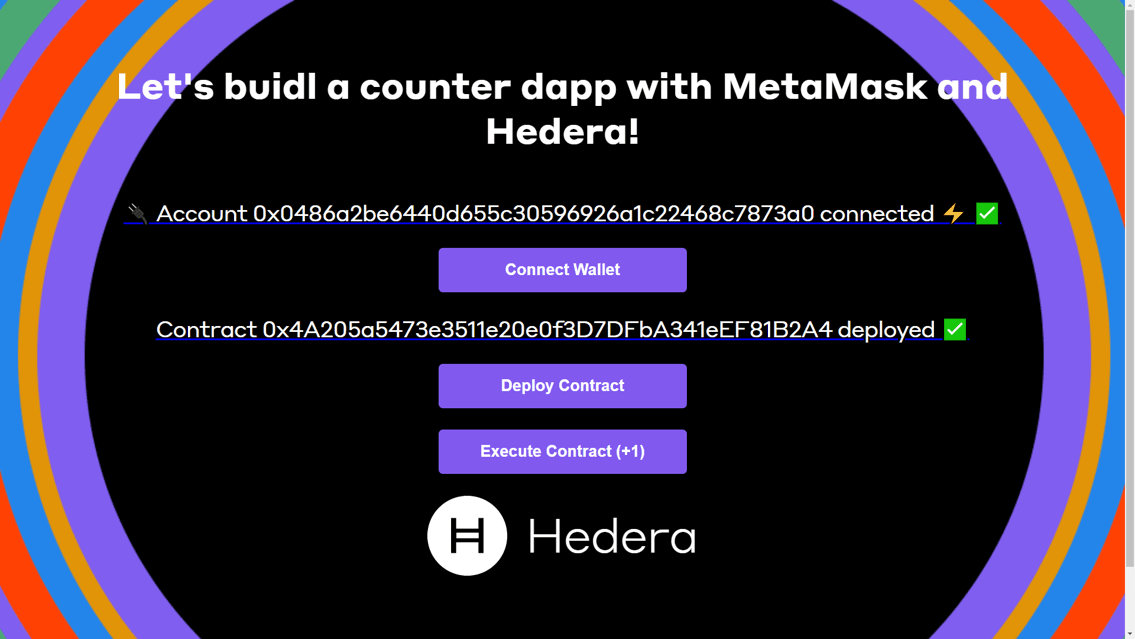
Below are a few images of what you would see when clicking the “Deploy Contract” button for the first time (remember to click on the hyperlinked text showing the contract address to view information on HashScan).
5. Interacting with the Smart Contract – Increase the Count Value
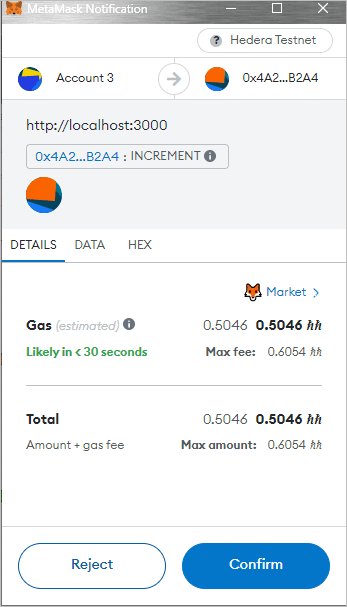
Finally, let’s execute the contract function to increase the count by 1. For this part, we’ll focus on the contractExecute() function (code tab 1) in App.jsx and the contractExecuteFcn() function (code tab 2) in src -> components -> hedera -> contractExecute.js.
When the “Execute Contract (+1)” button is pressed in the dApp, the contractExecute() function is executed. This function first checks if a contract is deployed. If not, it prompts the user to deploy one. If a Counter contract is deployed, the contractExecuteFcn() function is called with walletData and contractAddress as its arguments.
The contractExecuteFcn() function performs the following steps:
-
Get ethers provider and signer: It extracts the ethers provider and signer from the walletData.
-
Check the initial count: The function getCountState() uses the Hedera Mirror Node REST API and Axios to check the state of the count variable. The first time the contract is executed, that initial count should be zero.
-
Execute the contract function to increase count: Ethers JS is used along with the contractAddress, abi, and signer to execute the increment() function of the contract.
-
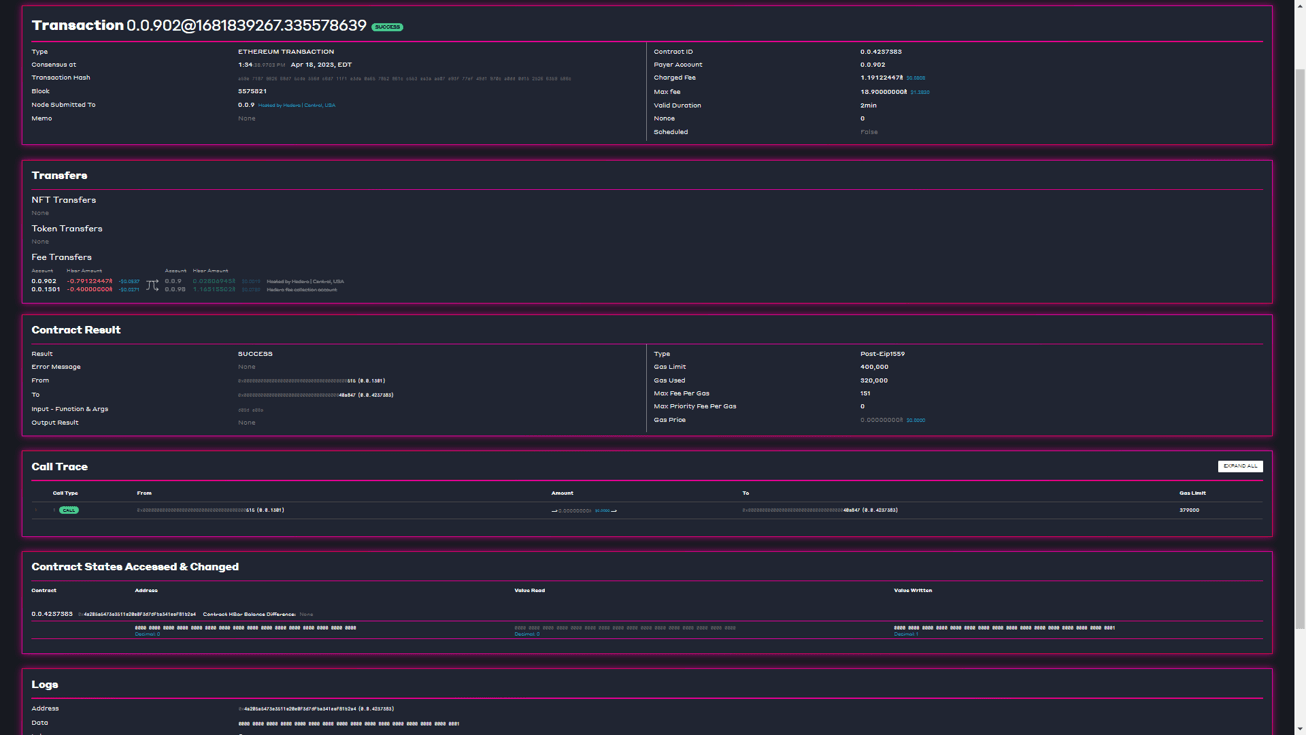
Check the final count: The function getCountState() is used again to check the value of count after executing the contract. Note that there is a 5-second delay to allow for the propagation of information from the consensus nodes to the mirror nodes. The transaction hash and the final value of count are returned.
Finally, the contractExecute() function updates the React UI with the new final count, the transaction hash, and the relevant HashScan hyperlink.
Below are a few images of what you would see after clicking the “Execute Contract” button (remember to click on the hyperlinked text showing the final count and transaction hash to view information on HashScan).

As a last note, you can also see the console messages from different functions and files in the browser inspector.
Summary
In this article, you went through the process of creating a counter dApp on the Hedera network using Solidity, React JS, MetaMask, and Ethers JS. The article covered these key concepts:
-
Cloning the example repository: You started by cloning the example repository that contains the necessary code and files for building the counter dApp
-
Understanding the dApp structure and UI: You delved into the custom React components used in the project, including MyGroup, MyButton, and MyText, and saw their roles and reusability
-
Connecting MetaMask to the dApp: You connected MetaMask to the dApp, switched to the Hedera Testnet, and paired an account using the connectWallet() and walletConnectFcn() functions
-
Deploying the smart contract: You deployed the Counter smart contract to the Hedera network using the contractDeploy() and contractDeployFcn() functions
-
Interacting with the smart contract: You increased the count state variable by executing the increment() contract function
By following this tutorial, you’ve learned how to integrate a React JS application with MetaMask, deploy and interact with a Solidity smart contract on the Hedera network, and gain insights into the structure and components of a dApp. Additionally, you’ve explored using Ethers JS for smart contract interaction, obtained on-chain information from Hedera mirror nodes, and viewed transaction details on HashScan (a Hedera Network Explorer).